Friday, June 4, 2021

Updating SharePoint UserProfile Properties

In case the SharePoint user profile property for a specific user or set of users then you can use the below powershell script to update the user profile property directly from sharepoint. 

$web=get-spweb -identity http://<weburl>


$user=$web.EnsureUser("<staffid with domain- user claims>")


$user | fl     -- this will show the user id and pass that id to below script in GetitembyID method


$web=get-spweb -identity  http://<weburl>


$list=$web.lists["user information list"]


$item=$list.GetItemById(6007) 


$item["JobTitle"]="<Title to update>"

$item["Department"]="<New Dept>"


$item.Update()


$list.Update()


$web.Update() 

Restore a search service application to another SharePoint farm

 The below script helps in restoring a search service application to another sharepoint farm. Before running below script, you need to take a back up of existing Search DB's ( with or without crawl db) to the new farms SQL server.


$saAppPoolName = "SearchService_AdminAppPool"


# Search Specifics, we are single server farm

$searchServerName = (Get-ChildItem env:computername).value


#Web Front End servers


$hostA = ""Server1"

$hostB = ""Server2"


#Servers hosting Search Components


$hostD = "Server1"

$hostE = "Server2" #In case of running components on multiple servers.


$IndexLocation = "F:\Apps\SearchIndex"


$serviceAppName = "Search Service Application"

$searchDBName = "Search Admin DB"

# Grab the Appplication Pool for Service Application Endpoint

$saAppPool = Get-SPServiceApplicationPool $saAppPoolName


# Start Search Service Instances

Write-Host "Starting Search Service Instances..."

#Start-SPEnterpriseSearchServiceInstance $searchServerName

#Start-SPEnterpriseSearchQueryAndSiteSettingsServiceInstance $searchServerName


# Create the Search Service Application and Proxy

Write-Host "Creating Search Service Application and Proxy..."

$searchInstance = Get-SPEnterpriseSearchServiceInstance -local

$searchServiceApp = Restore-SPEnterpriseSearchServiceApplication -Name $serviceAppName -ApplicationPool $saAppPoolName -AdminSearchServiceInstance $searchInstance -DatabaseName $searchDBName

$searchProxy = New-SPEnterpriseSearchServiceApplicationProxy -Name "Service Application and Proxy" -SearchApplication $searchServiceApp


# Clone the default Topology (which is empty) and create a new one and then activate it

Write-Host "Configuring Search Component Topology..."

$clone = $searchServiceApp.ActiveTopology.Clone()


#$searchServiceInstance = Get-SPEnterpriseSearchServiceInstance


$searchServiceInstance1 = Get-SPEnterpriseSearchServiceInstance -Identity $hostD

$searchServiceInstance2 = Get-SPEnterpriseSearchServiceInstance -Identity $hostE


#We need only two admin component


New-SPEnterpriseSearchAdminComponent -SearchTopology  $clone -SearchServiceInstance $searchServiceInstance1

New-SPEnterpriseSearchAdminComponent -SearchTopology  $clone -SearchServiceInstance $searchServiceInstance2


#We need two content processing components


New-SPEnterpriseSearchContentProcessingComponent -SearchTopology  $clone -SearchServiceInstance $searchServiceInstance1

#New-SPEnterpriseSearchContentProcessingComponent -SearchTopology $clone -SearchServiceInstance $searchServiceInstance2


#We need two analytics processing components


New-SPEnterpriseSearchAnalyticsProcessingComponent -SearchTopology  $clone -SearchServiceInstance $searchServiceInstance1

#New-SPEnterpriseSearchAnalyticsProcessingComponent -SearchTopology  $clone -SearchServiceInstance $searchServiceInstance2


#We need two crawl components


New-SPEnterpriseSearchCrawlComponent -SearchTopology  $clone -SearchServiceInstance $searchServiceInstance1

#New-SPEnterpriseSearchCrawlComponent -SearchTopology  $clone -SearchServiceInstance $searchServiceInstance2


#We need two query processing components


New-SPEnterpriseSearchQueryProcessingComponent -SearchTopology  $clone -SearchServiceInstance $searchServiceInstance1

New-SPEnterpriseSearchQueryProcessingComponent -SearchTopology  $clone -SearchServiceInstance $searchServiceInstance2


New-SPEnterpriseSearchIndexComponent -SearchTopology $clone -SearchServiceInstance $searchServiceInstance1 -RootDirectory $IndexLocation -IndexPartition 0

New-SPEnterpriseSearchIndexComponent -SearchTopology $clone -SearchServiceInstance $searchServiceInstance2 -RootDirectory $IndexLocation -IndexPartition 0


#New-SPEnterpriseSearchAdminComponent –SearchTopology $clone -SearchServiceInstance $searchServiceInstance

#New-SPEnterpriseSearchContentProcessingComponent –SearchTopology $clone -SearchServiceInstance $searchServiceInstance

#New-SPEnterpriseSearchAnalyticsProcessingComponent –SearchTopology $clone -SearchServiceInstance $searchServiceInstance

#New-SPEnterpriseSearchCrawlComponent –SearchTopology $clone -SearchServiceInstance $searchServiceInstance

#New-SPEnterpriseSearchIndexComponent –SearchTopology $clone -SearchServiceInstance $searchServiceInstance

#New-SPEnterpriseSearchQueryProcessingComponent –SearchTopology $clone -SearchServiceInstance $searchServiceInstance


$clone.Activate()


Get-SPEnterpriseSearchTopology -SearchApplication $ssa


# Additional


$ssa = Get-SPEnterpriseSearchServiceApplication "Search Service Application" 

 $admin = Get-SPEnterpriseSearchAdministrationComponent -SearchApplication $ssa

 $admin | Set-SPEnterpriseSearchAdministrationComponent -SearchServiceInstance $searchServiceInstance1 -Force 


 $si = Get-SPEnterpriseSearchServiceInstance -Identity a007f95c-e67e-4150-ab8f-7fff8a71d5b6

$varSearchApp = get-spenterprisesearchserviceapplication

Set-SPEnterpriseSearchAdministrationComponent -SearchApplication $varSearchApp -SearchServiceInstance $si


Feel free to reply in case of any queries

Monday, March 30, 2020

Read email body and headers and add it to an excel file- Power Automate

   This blogs explains how you can read the email contents and add to an excel file in SharePoint online using power automate (flow)

Below are the actions involve in this.


  • First you need to add a trigger on the flow to start when an emails receives in you mailbox.
  • Add a "Html to text" action, Content field set to Body dynamic content of the trigger.


  •  Add a "Compose" action for each value you want to extract from your email, Inputs set to following formula (Sample email below)
  •                                 
    To grab any of those fields in Flow you use a formula like this (example grabs the email)
    trim(
    substring(
    body('Html_to_text'),
    add(
    indexOf(
    body('Html_to_text'),
    'Name:'),
    7),
    sub(
    indexOf(
    body('Html_to_text'),
    'Leave Type:'),
    add(
    indexOf(
    body('Html_to_text'),
    'Name:'),
    7)
    )
    )
    )


    The breakdow of above formula is given below.
    The subsstring() function has 3 inputs, 1. the source string, 2. the start index, which is the number of characters into the string to start looking and 3. the length.

    The objective therefore, is to derive 2. and 3. so we can grab the relevant text no matter how long is it.

    So firstly we need to know how many characters into the source text to start. This is relatively easy:
    add(
    indexOf(
    body('Html_to_text'),
    'Name:'),
    7)
    he indexOf() function finds the number of characters into a text string that a string occurs. Here we are calculating the indexOf() the string "Name: " it doesn't matter where in the original message body this occurs, indexOf() will find it and return a number.

    Now we don't actually want the string "Name: " in the output of this expression so we now add() a number to the output of indexOf() to get the number of characters into the message body the end of "Name: " occurs. We don't calculate this dynamically; it's 7, including the space.

    So by using indexOf() to find the place in the source string where "Name: " exists, then adding that number of characters to it, we get the point we want to start reading the email address.

    Next we have to calculate the length of the string, for the 3rd parameter of substring():
    sub(
    indexOf(
    body('Html_to_text'),
    'Leave Type:'),
    add(
    indexOf(
    body('Html_to_text'),
    'Name:'),
    7)
    )
    To do this we use the sub() function to subtract the number we just calculated from the indexOf() the place we want to stop looking. Thus a lot (the second parameter of sub()) of the expression above is similar to the one before - calculating the number of characters into the source string that our relevant text starts.

    The first parameter of sub() is the place where our relevant text ends - which in this case is the start of the string "Leave Type: ". We don't need to do anything complex with this because it's the start of the string we want the index of, not the end.

    So we now have our 3 parameters for substring(), the source text, which is body('Html_to_text') in this example, the number of characters into that where we find the start of our substring and lastly length, which is calculated by subtracting the former from the number of characters into the source text where we want to stop looking.

    Finally, in my example I've wrapped trim() around the whole thing to eliminate any trailing whitespace.
    • Add a row to table action from Excel online business to the flow and map each columns and the excel table.
    • dd

    Send an email to the mailbox and you will see the selected rows added to your excel.

    Wednesday, December 4, 2019

    Create PowerApps for Face Detection using Microsoft Azure Cognitive Services and Power Automate

    This article explains how to handle the azure cognitive service APIs within Microsoft Flow(power automate) and use the flow from PowerApps. Microsoft Flow team has released new connectors for Azure cognitive service API which are in preview now. It includes Computer Vision and Face API, still I would go with http connector which is tested one.
    Each connector has a different set of actions. We can use those actions by passing the proper input to the connections.
    Requirements
    1. Face API URL & Key
    2. On-Premises Data Gateway – SQL Server
    3. Microsoft Flow – Free subscription or O365 subscription
    Creating Face API\
    To create a Face API, you need an Azure Subscription. If you don’t have a subscription, then you can get a free Azure subscription from here.
    Visit portal.azure.com and click “Create a Resource”.
    Under new, choose “Ai + Machine Learning” -> Face


    Create a new face resource by providing the required details.

    Once the resource is created, you need to get the key and URL (EndPoint).
    Note down the endpoint and key and we will use it on Microsoft Flow.
    PowerApps
    Sign in to your PowerApps account and click Canvas App from Blank. Choose the Phone from Factor option and provide a name to your app and then click create


    Once you created the app, Click Media under insert tool bar and then Insert the Camera on the screen to take the picture.

    You will be able to see the number zero in camera property function bar. Which shows only rear camera.

    So in order to use the front camera we need to create a toggle button. Insert toggle button from controls and in OnChange property paste this code UpdateContext({EnableFront:!EnableFront})


    Now Click the camera and change its camera property to If(EnableFront=true,1,0) and change the camera OnSelect property to ClearCollect(capturedimage,Camera1.Photo)

    We have created the camera and now we need insert the image from media tab so that we can see our captured image. Once image has been inserted change its OnSelect property to First(capturedimage).Url.
    Now we need to create a flow so click action tab and click flows you will get a window which will show create a new flow. Click that. A new page will be opened and you can see the flow. Click next step and create SharePoint file to store our input image. you need to add the Site Address, Folder Path, File Name. Moreover, you need to send the actual image file from Power Apps with the name of Create_FileContent

    In the next step, we need to pass it to the Compose component for the aim of store it in a variable ands also pass it to the HTTP component.

    Here in the ComposeComponent, we have to convert the picture to the binary format using the function dataUriToBinary(triggerBody()[‘Createfile_FileContent’]) to do that, first click on the input then in the Expression search for the function dataUriToBinary then for the input choose the Createfile_FileContent.

    In next step, we are going to pass the binary file (picture) to a component named HTTP. This component is responsible for calling any API by passing the Url, Key and the requested fields. Choose a new action, and search for the http and select it

    In http component, choose the Post for the Method, Url”https://westcentralus.api.cognitive.microsoft.com/face/v1.0/detect
    for headers:
    Ocp-Apim-Subscription-Key: put the API key from Azure
    Content-Type: application/octet-stream
    then we need to provide the Queries: 
    the first attribute is
    returnFaceAttribute: that need to return below components from a picture:
    age,gender,emotion,smile,hair,makeup,accessories,occlusion,exposure,noise

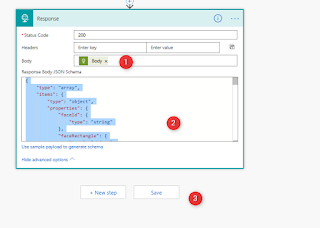
    Now we need another component to be able to pass the result to Power Apps, as a result. In the new action search for the response, then for status code select 200, for Body choose the Body, and for the Response Body JSON Schema paste the below codes

    Code: {
    “type”: “array”,
    “items”: {
    “type”: “object”,
    “properties”: {
    “type”: “string”
    “faceId”: {
    }
    “type”: “object”,
    ,
    “faceRectangle”: {
    “top”: {
    “properties”: {
    “type”: “integer”
    “type”: “integer”
    }
    ,
    “left”: {
    }
    }
    ,
    “width”: {
    “type”: “integer”
    ,
    }
    “height”: {
    “type”: “integer”
    } }
    “type”: “number”
    , “faceAttributes”: {
    “type”: “object”,
    “properties”: { “smile”: {
    “age”: {
    } ,
    “gender”: {
    “type”: “string”
    “properties”: {
    } ,
    “type”: “integer”
    }
    “emotion”: {
    ,
    “contempt”: {
    “type”: “object”, “anger”: {
    “type”: “integer”
    } ,
    ,
    “type”: “number” }
    “disgust”: {
    ,
    }
    “type”: “integer”
    }
    “fear”: { “type”: “integer”
    ,
    } “happiness”: {
    }
    “type”: “number” ,
    “neutral”: {
    “type”: “number”
    }
    “sadness”: {
    ,
    ,
    “type”: “integer”
    “properties”: {
    “surprise”: {
    “type”: “number”
    }
    ,
    } }
    “type”: “object”,
    “exposure”: {
    }
    “exposureLevel”: {
    “type”: “string”
    }
    “value”: {
    ,
    }
    “type”: “number” }
    “value”: {
    ,
    “noise”: {
    “type”: “object”,
    “properties”: {
    “noiseLevel”: {
    “type”: “string” }
    “type”: “boolean”
    , “type”: “number”
    }
    } } ,
    “properties”: {
    “makeup”: { “type”: “object”,
    ,
    “eyeMakeup”: { }
    ,
    “lipMakeup”: {
    “type”: “boolean”
    }
    ,
    } }
    “type”: “array”
    “accessories”: { }
    }
    “occlusion”: { “type”: “object”,
    “foreheadOccluded”: {
    “properties”: {
    ,
    “type”: “boolean” }
    “type”: “boolean”
    “eyeOccluded”: { ,
    }
    “mouthOccluded”: {
    “type”: “boolean”
    }
    ,
    } }
    “type”: “object”,
    “hair”: { “properties”: {
    “type”: “number”
    “bald”: {
    “properties”: {
    ,
    “invisible”: {
    “type”: “boolean”
    }
    “hairColor”: {
    ,
    “items”: {
    “type”: “array”,
    “color”: {
    “type”: “object”,
    “required”: [ “color”,
    “type”: “string”
    }
    “confidence”: {
    ,
    }
    “type”: “number” }
    }
    , “confidence”]
    “faceAttributes”]
    }
    }
    }
    } } }
    “faceRectangle”,
    ,
    “required”: [ “faceId”,
    Now we just need to save the Flow. The flow is created, now we need to connect it to the Power Apps. Go back to PowerApps and Add the button by clicking the        Insert-> Button and connect the created flow by clicking Action -> Flows and select the created flow and paste the below code and ClearCollect(facedata,yourflowname.Run(First(capturedimage).Url)). Enter your flow name in the mentioned place.
    Next step is to create a gallery by clicking Insert -> Gallery -> Blank vertical
    It adds a big on to the screen, resize it to be fit for the image cover. There are two things we need to do: first, add the data source to it. we want the gallery able to detect the faces, so we need to add the result of face recognition to the gallery. Under properties you can see items which has drop down in that select facedata and we linked the data.
    Now we need to insert the rectangle for face detection. Rectangle can be inserted by Insert -> icons -> rectangle. Now, need to change the properties of it and to make it as an unfilled rectangle. click on the rectangle then change the more bored size to be bigger. you also able to change the color and so forth, However, the rectangle still is not dynamic, it always located in the top of the window, and if you run the code by clicking on the top of the page still you not able to see the rectangle. To set a rectangle around the face of the people in the image we need to align it by setting the parameters
    first the OnSelect:  as you can see in the picture for Onselect attribute the formula is Select(Parent)
    the next parameter  need to set is about the location of the rectangle
    click on the Height Parameter then write the below codes
    ThisItem.faceRectangle.height*(Image1.Height/Image1.OriginalHeight)
    do the same for width
    ThisItem.faceRectangle.width*(Image1.Width/Image1.OriginalWidth)
    or you can put for X
    ThisItem.faceRectangle.left*(Image1.Width/Image1.OriginalWidth)
    and for the Y value
    ThisItem.faceRectangle.top*(Image1.Height/Image1.OriginalHeight)
    To create a interactive app change the image Height, Width, X, Y to Camera1.Height, Camera1.Width, Camera1.X, Camera1.Y respectively and mode the Image1 to top.
    Now we are going to put some label into the page to show the age, gender, expression and so forth.
    to show this information insert a new lable to the page.
    “Age:”& Gallery1.Selected.faceAttributes.age
    then now add other attributes like gender, Happiness, Neutral and so forth.
    like happiness
    “Happiness:”& Gallery1.Selected.faceAttributes.emotion.happiness
    “Gender:”& Gallery1.Selected.faceAttributes.gender
    To show the hair color we can create a data table by clicking on Insert-> Data Table in the item attribute of Data Table, write the below code
    Gallery1.Selected.faceAttributes.hair.hairColor
    To delete the photo Insert -> icons -> Trash and change the OnSelect to UpdateContext({conShowPhoto:false})
    Now click the preview button and take photo and check the app and delete the photo and play again.

    Tuesday, September 24, 2019

    Email Enabled lists in Office 365 & SharePoint Online

    For many years, users of SharePoint have enjoyed a handy feature known as “Incoming Email”.  This feature allows for assigning email addresses to SharePoint lists.  Emails sent to the assigned email address will process to the list associated to that email address.  However, as organizations begin to migrate to Office 365 they are left with the dilemma of whether to seek alternatives or abandon this functionality all together.  Why you ask?  This is because the incoming email feature is no longer available in SharePoint Online out of the box.


    Why is the feature not available in SharePoint Online?

    To answer this question, one must first learn how the on-premises “Incoming Email” feature works.  Figure 1-1 below shows the typical flow of an incoming email into SharePoint

    1. The User sends the email to an address like testlist@sp.demo.com
    2. The mail server forwards that email on to an SMTP server that is set up for the SharePoint Farm.
    3. Once this SMTP server receives the email, it places it in a drop folder.
    4. The incoming email timer job runs on a schedule to read in email messages in this folder and process them to the list that matches the email address the message was sent to.
    Figure 1-2 below shows one of the reasons why this feature does not work in SharePoint Online


    1. SharePoint Online restricts users to Site collection or below. No more farm level access exists for your SharePoint site.  This means the farm level timer jobs and configuration settings that used to take care of this processing no longer exist.
    2. Since these settings do not exist on the back-end, they have also been removed from the front-end list settings as well.

    What are my Options?

    Now that we covered reasons why this feature is not available out of the box, we need to address what can be done about it.  In this void of having a solution to for this feature, many players have showed up on the scene.  Below I have listed some of the options, and the advantages and disadvantages to each.

    Option 1: Site Mailboxes (This is no more an option as SPO deprecated Site Mailbox feature as of July 2017)

    This option allows for setting up an Exchange mailbox used to collaborate between team members.  Emails can be sent to the mailbox to be shared among team members.
    Advantages
    • Allows end users to create these mailboxes from the SharePoint online ‘Add an app’ page.
    • Permissions set on the SharePoint site are also applied to the mailbox.
    Disadvantages
    • Only one mailbox can be created per site.
    • Mail and documents do not live in SharePoint. Data is accessed through Outlook Web Access.
    • Site Mailbox is chosen for you based on the SharePoint site name.
    • Cannot set up event receivers or workflows on the data.
    • Documents and emails are opened in outlook web access, and not SharePoint.

     Option 2: Office 365 Groups

    Uses the Office 365 group functionality to set up a shared work space for collaboration.
    Advantages
    • A collaboration space is created to share documents, calendars, conversations.
    • Feature is integrated with your OneDrive for Business site.
    Disadvantages
    • Every group creates a new hidden site collection.
    • No workflow options.

    Option 3: Azure Logic Apps

    Azure Logic Apps can be used to set up connectors between an Office 365 mailbox and a SharePoint list.
    Advantages
    • Processes email within a mailbox to the associated SharePoint list.
    Disadvantages
    • Must have an Azure subscription.
    • Must pay licensing fee for Logic Apps.
    • Requires setting up a new user and mailbox for each list (requires user to be licensed for Exchange Online and SharePoint Online).

    Option 4: Microsoft Flow

    Microsoft Flow is a feature offered in Office 365 to allow processing email messages in Office 365 to SharePoint libraries.
    Advantages
    • Can process email attachments from an Office 365 mailbox into SharePoint.
    • Can configure to use one mailbox to process to many different lists.
    Disadvantages
    • Requires setting up a user to go with a mailbox in Office 365 (requires user to be licensed for Exchange Online and SharePoint Online).
    • Only has template for email attachment. No current offering to save the email itself.
    • Additional cost per user for Microsoft Flow Licensing.

    Option 5: 3rd Party Paid Apps

    There are many 3rd party paid apps out there that offer similar or replace this out of the box functionality.
    Advantages
    • Usually moderately priced.
    • Offers functionality similar in nature to the out of the box solution.
    Disadvantages
    • Some of the major players charge based on the number of emails processed.
    • Most also require a mailbox per list to be processed (would require licensing each mailbox)

    Option 6: Custom Code

    By writing custom code to replace this functionality, you are provided with a customized solution for processing these emails.
    Advantages
    • Custom solution.
    • Can use existing infrastructure.
    • Ability to configure the polling schedule.
    • No need for extra licensing.
    • Users allowed to configure the list settings.
    Disadvantages
    • Requires an existing SMTP server and a asp.net server for the process to function.