Tuesday, May 16, 2017

Update SharePoint Online userprofile properties - Powershell

The below powershell script is to update a user profile property called 'CostCenter' and you can replace with your property and update it.

Add-Type -Path "C:\Program Files\Common Files\Microsoft Shared\Web Server Extensions\16\ISAPI\Microsoft.SharePoint.Client.dll"
Add-Type -Path "C:\Program Files\Common Files\Microsoft Shared\Web Server Extensions\16\ISAPI\Microsoft.SharePoint.Client.Runtime.dll"
Add-Type -Path "C:\Program Files\Common Files\Microsoft Shared\Web Server Extensions\16\ISAPI\Microsoft.SharePoint.Client.UserProfiles.dll"


$SiteUrl = "https://tenant-admin.sharepoint.com"


$password = Read-Host -Prompt "Enter password" -AsSecureString

$credentials = New-Object Microsoft.SharePoint.Client.SharePointOnlineCredentials("jollsam@tenant.com", $password)


#Set up the context
$Context = New-Object Microsoft.SharePoint.Client.ClientContext($SiteUrl)
$Context.Credentials = $credentials

$targetAccount = "i:0#.f|membership|jollsam@tenant.com"

$PropertyName= "CostCenter"

$Value = "17029"

$peopleManager = New-Object Microsoft.SharePoint.Client.UserProfiles.PeopleManager($Context)

Write-Host "Updating User Profile Property `"$PropertyName`" for account - `"$targetAccount`"" -ForegroundColor Green

$peopleManager.SetSingleValueProfileProperty($targetAccount, $PropertyName, $Value)

$Context.ExecuteQuery()

Wednesday, March 22, 2017

Users unable to access sub folders in SharePoint 2013 - Limited Access issue

This issue happens when you migrate your site from SharePoint 2010 to SharePoint 2013 and you have Limited Access users in your site.
My scenario was below.
Problem
  • I have a sharepoint 2013 site and a document library inside.
  • Have more than 2 sub folders for the document library.
  • Few Users are directly given access to the sub folders without any permission on Library and site.
  • The above users are getting access denied while accessing the folder where they have been given Read/Contribute access.

Cause
  • Since we don't have Limited Access permission level in SharePoint 2013  and when you give users Read/Contribute access to the sub folders, user are not added as Limited Access to the library level.
  • still users should be able to access the sub folders directly as access is given.
  • This issue mainly happens with Publishing sites as when you activate publishing feature, one more site collection feature gets activated as below
  • LimitedAccess_Activated
  • This feature will prevent users with limited access to access the sub folders in library.

Resolution
Just deactivate the site collection feature and you are good to go.
LimitedAccess_Deactivated
The ViewFormPagesLockDown Feature (Site Collection) in SharePoint 2013 is activated and visible by default. This is not the case for previous SharePoint versions.

Thursday, March 2, 2017

Using Microsoft Azure Active Directory for SharePoint 2013 authentication


Summary: Use the Azure Access Control Service to authenticate your SharePoint Server 2013 users with Azure Active Directory.

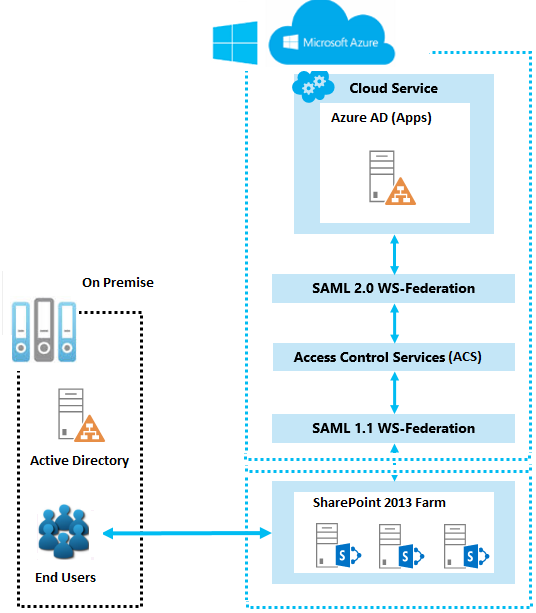
This article explains how you can use the Azure Access Control Service to authenticate your SharePoint 2013 users with Azure AD, instead of your on-premises Active Directory. In this configuration, Azure AD becomes a trusted identity provider for SharePoint 2013. This configuration adds a user authentication method that is separate from Active Directory authentication used by the SharePoint 2013 installation itself. For more information on WS Federation, see Understanding WS-Federation.
The below diagram shows how authentication works for SharePoint 2013 users in this configuration.
ic728833

Configuration Overview

  1. Create a new Azure AD tenant and namespace.
  2. Add a WS-Federation identity provider.
  3. Add SharePoint as a relying party application.
  4. Create a rule group for claims-based authentication.
  5. Configure the X.509 certificate.
  6. Create a claim mapping.
  7. Configure SharePoint for the new identity provider.
  8. Set the permissions.
  9. Verify the new provider.

    Create ACS and Azure AD App

    Use the following steps to create a new Azure AD tenant and an associated namespace. In this example, we use the namespace "specmazureadservice"
    1. In the Azure Management Portal, click Active Directory.
    2. Click Access Control Namespaces, and create a new namespace.
    3. Click Manage on the bottom bar. This should open this location, https://specmazureadservice.accesscontrol.windows.net/v2/mgmt/web.
    4.  
    5. Go to Azure AD and create new App. In my  case the app name is 'AZ AD Tenant APP'.
    6. Put the Sign-on Url same as ACS url "https://specmazureadservice.accesscontrol.windows.net/"
    7. App ID can be any unique url. I have used the same ACS url.
    8. For Reply URL, use the same ACS url "https://specmazureadservice.accesscontrol.windows.net/"
    9. Save the App.
    10. click on the "View Endpoints" at bottom and copy "Federation Metadata Document" url.

Add a WS-Federation identity provider to the namespace

Use the following steps to add a new WS-Federation identity provider to the "specmazureadservice" namespace.
  1. From the Azure management portal, go to Active Directory > Access Control Namespaces, select the ACS created  and then click Manage.
  2. From the Azure Access Control portal, click Identity Providers > Add, as illustrated in the following figureacshome
  3. Click WS-Federation identity provider, as illustrated in the following figure, and then click Nextacs_addidprovider
Fill out the display name and logon link text, and then click Save. For the WS-Federation metadata URL, put the url copied from AD App Federation Metadata document. eg. https://login.microsoftonline.com/e0b26355-1889-40d8-8ef1-e559616defth/federationmetadata/2007-06/federationmetadata.xml. The following picture illustrates the setting.acs_addws-fedidprovider
Add SharePoint as a relying party application
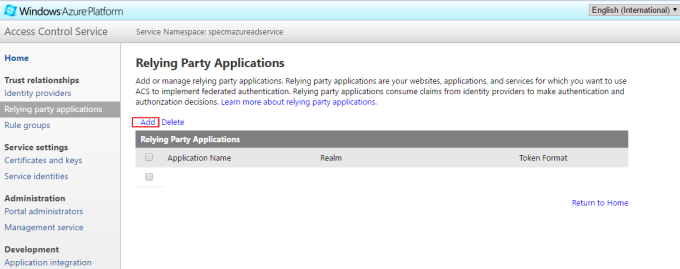
  1. From the Azure Access Control portal, click Relying party applications, and then click Add, as illustrated in the following pictureacs_addrelypartapp
  2. Provide the display name  eg "ECM Azure AD Rely".
  3. provide Realm , eg - "urn:sharepoint:spapps-stg".
  4. provide Return url as your sharepoint web application url "/_trust" , eg- "http://sharepoint.com/_trust".
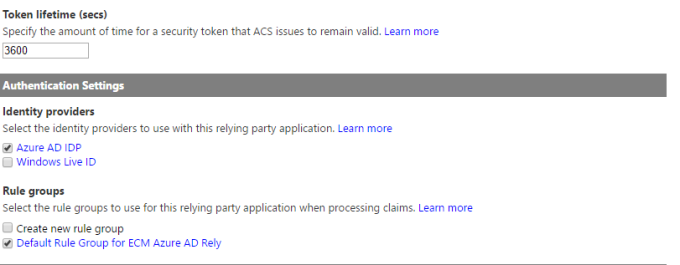
Select SAML 1.1 as the token format url. Select IDP and click save. Below picture gives an overview of how it looks like.acs_addrelypartysettingsacs_addrelypartysettings2

Create a rule group for claims-based authentication

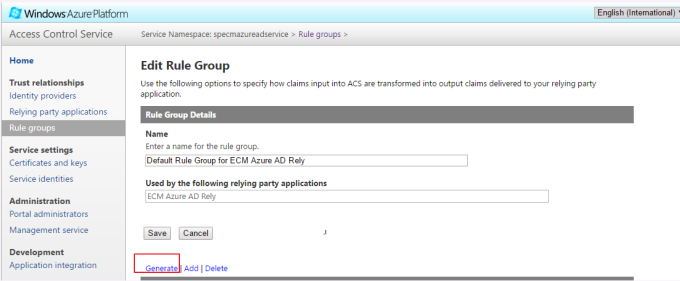
  1. In the left pane, click Rule groups, and then click Add.
  2. Type a name for the rule group, click Save, and then click Generate. For the purposes of this article, we are using Default Rule Group for. ECM Azure AD Rely, as illustrated in the below picture.acs_rulegroup
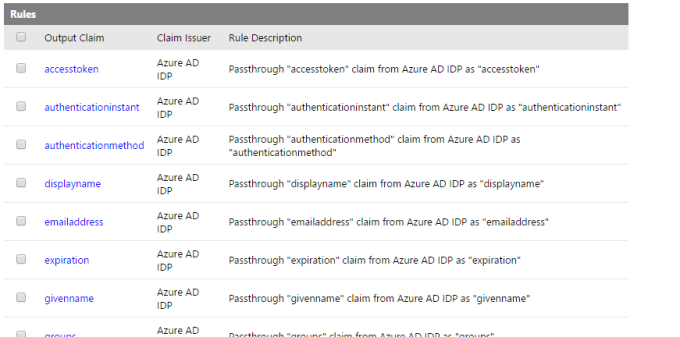
    acs_rules
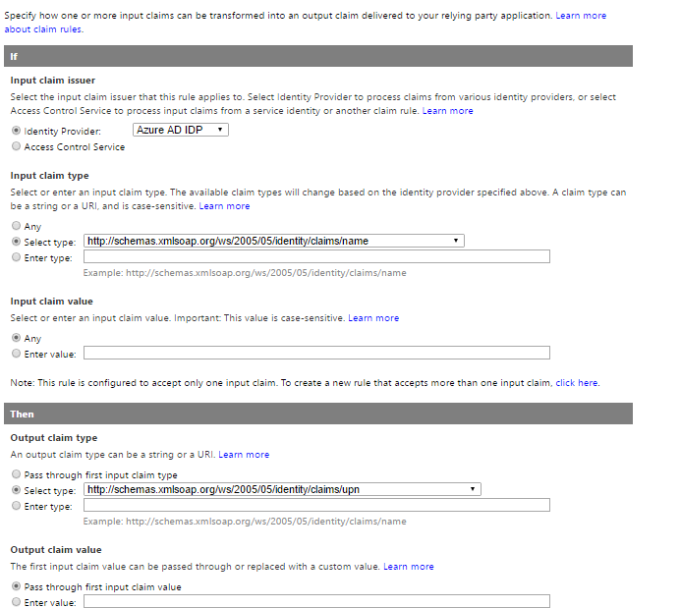
Click the rule group that you want to change, and then click the claim rule that you want to change. For the purposes of this article, we add a claim rule to the group to pass name as upn, as illustrated by the below picture.acs_newclaimrule

Configure the X.509 certificate

  1. In the Access Control Service pane, Click on Certificates and Keys as given in below pciture certandkeys
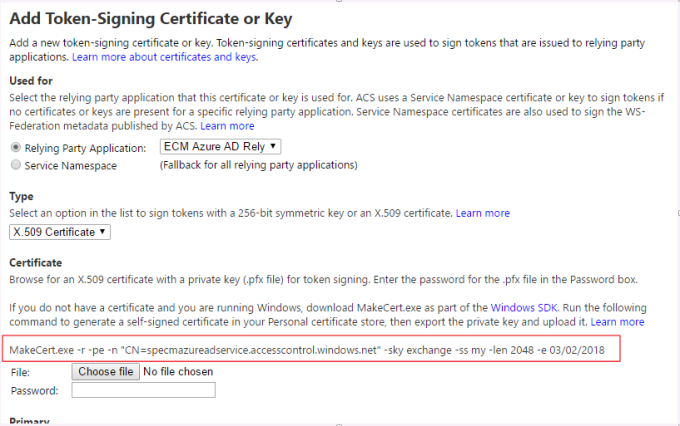
  2. Click on Add and copy the makecert command as highlighted in below picture.addtokensigningcert
  3. Create a new certificate with the command in local machine and export it as .pfx (with password) and .cer .
  4. Upload the TokenSigning certificate in the choose file and provide the same password.
  5. Make it primary and click save.

Create a claim mapping by using SharePoint Management Shell

Below is the script I used to configure the claim mapping and New Trusted Identity provider for Azure AD Connect.
$realm = "urn:sharepoint:spapps-stg"
$cert = New-Object System.Security.Cryptography.X509Certificates.X509Certificate2("F:\Jollgin\certs\ACSTokenSigning.cer")
New-SPTrustedRootAuthority -Name "ACS EK Token Signing" -Certificate $cert
$map = New-SPClaimTypeMapping -IncomingClaimType "http://schemas.xmlsoap.org/ws/2005/05/identity/claims/upn" -IncomingClaimTypeDisplayName "UPN" -SameAsIncoming
$map2 = New-SPClaimTypeMapping -IncomingClaimType "http://schemas.xmlsoap.org/ws/2005/05/identity/claims/givenname" -IncomingClaimTypeDisplayName "GivenName" -SameAsIncoming
$map3 = New-SPClaimTypeMapping -IncomingClaimType "http://schemas.xmlsoap.org/ws/2005/05/identity/claims/surname" -IncomingClaimTypeDisplayName "SurName" -SameAsIncoming

New-SPTrustedIdentityTokenIssuer -Name "ACS Provider" -Description "SharePoint secured by SAML in ACS" -realm $realm -ImportTrustCertificate $cert -ClaimsMappings $map,$map2,$map3 -SignInUrl "https://specmazureadservice.accesscontrol.windows.net/v2/wsfederation" -IdentifierClaim "http://schemas.xmlsoap.org/ws/2005/05/identity/claims/upn"

Configure SharePoint for the new identity provider

  1. Verify that the user account that is performing this procedure is a member of the Farm Administrators SharePoint group.
  2. In Central Administration, on the home page, click Application Management.
  3. On the Application Management page, in the Web Applications section, click Manage web applications.
  4. Click the appropriate web application.
  5. From the ribbon, click Authentication Providers.
  6. Under Zone, click the name of the zone. For example, Im using Custom as my web application is an extended one.
  7. On the Edit Authentication page, in the Claims Authentication Types section, select Trusted Identity provider, and then click the name of your provider, which for purposes of this article is ACS Provider. Click OK.
The below picture illustrates the Trusted Provider settingsptrustedidp

Set the permissions

For testing purpose, Go to user policy in web application and provide everyone read access to the web application and later on remove and give individual permissions in site level.

Verify the new provider

  1. Enter the web application url in browser.
  2. I had my custom login page and it looks like belowsplogin
  3. Click on Azure AD Connect and you will be redirected to login.microsoftonline.com. Provide you organization account or onmicrosoft account and once authenticated with Azure AD, you will be back to the SharePoint onpremise application.
With this you have acheived the WS Federation login for your on premise sharepoint application, you can have onmicrosoft account which is not in you AD and login to on premise sharepoint application.

Monday, February 20, 2017

Migrate SharePoint Users to/from ADFS

Moving from a domain authentication between ADFS authentication and on premise AD authentication is becoming a not uncommon activity these days, partly because incorporating ADFS into your on-premises farm is the first step in moving either completely or partially into SharePoint Online.
Step 1. You need to move the content db to the target farm and attach it. users wont be able to access until you do the user migration.
Step 2. User Migration - Script is given below for getting list of users and migrate. 
#Start
Set-PSDebug -Strict
add-pssnapin microsoft.sharepoint.powershell -erroraction 0

# Select Options
Write-Host -ForegroundColor Yellow "'Document' will create a CSV dump of users to convert. 'Convert' will use the data in the CSV to perform the migrations."
Write-Host -ForegroundColor Cyan "1. Document"
Write-Host -ForegroundColor Cyan "2. Convert"
Write-Host -ForegroundColor Cyan " "
[int]$Choice = Read-Host "Select an option 1-2: "

switch($Choice)
{
1 {[bool]$convert = $false}
2 {[bool]$convert = $true}
default {Write-Host "Invalid selection! Exiting... "; exit}
}
Write-Host ""

$objCSV = @()
[string]$csvPath = Read-Host "Please enter the path to save the .csv file to. (Ex. C:\migration)"
if ((Test-Path -LiteralPath $csvPath) -eq $false) {
Write-Host "Invalid path specified! Exiting..."; exit
}

if($convert-eq $true)
{
$objCSV = Import-CSV "$csvPath\MigrateUsers.csv"

foreach ($object in $objCSV)
{
$user = Get-SPUser -identity $object.OldLogin -web $object.SiteCollection
write-host "Moving user:" $user "to:" $object.NewLogin "in site:" $object.SiteCollection
move-spuser -identity $user -newalias $object.NewLogin -ignoresid -Confirm:$false
}
}
else
{
[string]$oldprovider = Read-Host "Enter the Old Provider Name (Example -> Domain\ or i:0#.f|MembershipProvider|) "
[string]$newprovider = Read-Host "Enter the New User Provider Name (Example -> Domain\ or i:0e.t|MembershipProvider|) "
[string]$newsuffix = Read-Host "Enter the UPN suffix for the new provider, if desired (Example -> @domain.com) "
[string]$newGroupProvider = Read-Host "Enter the New Group Provider Name (Example -> Domain\ or c:0-.t|MembershipProvider|domain.com\) "


# Select Options
Write-Host -ForegroundColor Yellow "Choose the scope of the migration - Farm, Web App, or Site Collection"
Write-Host -ForegroundColor Cyan "1. Entire Farm"
Write-Host -ForegroundColor Cyan "2. Web Application"
Write-Host -ForegroundColor Cyan "3. Site Collection"
Write-Host -ForegroundColor Cyan " "
[int]$scopeChoice = Read-Host "Select an option 1-3: "

switch($scopeChoice)
{
1 {[string]$scope = "Farm"}
2 {[string]$scope = "WebApp"}
3 {[string]$scope = "SiteColl"}
default {Write-Host "Invalid selection! Exiting... "; exit}
}
Write-Host ""
if($scope -eq "Farm")
{
$sites = @()
$sites = get-spsite -Limit All
}
elseif($scope -eq "WebApp")
{
$url = Read-Host "Enter the Url of the Web Application: "
$sites = @()
$sites = get-spsite -WebApplication $url -Limit All
}
elseif($scope -eq "SiteColl")
{
$url = Read-Host "Enter the Url of the Site Collection: "
$sites = @()
$sites = get-spsite $url
}

foreach($site in $sites)
{
$webs = @() #needed to prevent the next foreach from attempting to loop a non-array variable
$webs = $site.AllWebs

foreach($web in $webs)
{
# Get all of the users in a site
$users = @()
$users = get-spuser -web $web -Limit All #added "-limit" since some webs may have large user lists.

# Loop through each of the users in the site
foreach($user in $users)
{
# Create an array that will be used to split the user name from the domain/membership provider
$a=@()
$displayname = $user.DisplayName
$userlogin = $user.UserLogin

if(($userlogin -like "$oldprovider*") -and ($objCSV.OldLogin -notcontains $userlogin))
{
# Separate the user name from the domain/membership provider
if($userlogin.Contains('|'))
{
$a = $userlogin.split("|")
$username = $a[1]

if($username.Contains('\'))
{
$a = $username.split("\")
$username = $a[1]
}
}
elseif($userlogin.Contains('\'))
{
$a = $userlogin.split("\")
$username = $a[1]
}

# Create the new username based on the given input
if ($user.IsDomainGroup) {
[string]$newalias = $newGroupProvider + $username
} else {
[string]$newalias = $newprovider + $username + $newsuffix
}


$objUser = "" | select OldLogin,NewLogin,SiteCollection
$objUser.OldLogin = $userLogin
$objUser.NewLogin = $newAlias
$objUser.SiteCollection = $site.Url

$objCSV += $objUser
}
}
}
$site.Dispose()
}

$objCSV | Export-Csv "$csvPath\MigrateUsers.csv" -NoTypeInformation -Force
}
#End
csv format is as below.
ADFS to onpremise
OldLoginNewLoginSiteCollection
i:05.t|adfs|explporetest@sp.comi:0#.w|domain\explporetesthttps://exploresharepointfeatures.sharepoint.com/sites/test

onpremise to ADFS
OldLoginNewLoginSiteCollection
i:0#.w|domain\explporetesti:05.t|adfs|explporetest@sp.comhttps://exploresharepointfeatures.sharepoint.com/sites/test

Thursday, February 16, 2017

Update SharePoint Online Audit settings using powershell

You can use below scrip to update Audit settings in SharePoint online using powershell csom. For updating in all site, just loop through all site collections and update it.


#Load SharePoint CSOM Assemblies
[System.Reflection.Assembly]::LoadFile("<dllPath>\Microsoft.SharePoint.Client.dll") | Out-Null
[System.Reflection.Assembly]::LoadFile("<dllPath>\Microsoft.SharePoint.Client.Runtime.dll") | Out-Null


#$SiteUrl = "https://emiratesgroup.sharepoint.com/sites/spdev"
$Password = ConvertTo-SecureString "<enter pswd here>" -AsPlainText –Force
$User = "jo@domain.com"
$credentials = New-Object Microsoft.SharePoint.Client.SharePointOnlineCredentials($User, $Password)

     
        $SiteUrl = $object.SiteCollection
$Context = New-Object Microsoft.SharePoint.Client.ClientContext($SiteUrl)
$Context.Credentials = $credentials

 $spoSite = $Context.Site
    $Context.Load($spoSite)
    $Audit = $spoSite.Audit
    $Context.Load($Audit)
    $Context.ExecuteQuery()

$All = [Microsoft.SharePoint.Client.AuditMaskType]::All;
    $None = [Microsoft.SharePoint.Client.AuditMaskType]::None;
    $CheckIn = [Microsoft.SharePoint.Client.AuditMaskType]::CheckIn;
    $CheckOut = [Microsoft.SharePoint.Client.AuditMaskType]::CheckOut;
    $ChildDelete = [Microsoft.SharePoint.Client.AuditMaskType]::ChildDelete;
    $CheckIn = [Microsoft.SharePoint.Client.AuditMaskType]::CopyCheckIn;
    $Move = [Microsoft.SharePoint.Client.AuditMaskType]::Move;
    $ObjectDelete = [Microsoft.SharePoint.Client.AuditMaskType]::ObjectDelete;
    $ProfileChange = [Microsoft.SharePoint.Client.AuditMaskType]::ProfileChange;
    $SchemaChange = [Microsoft.SharePoint.Client.AuditMaskType]::SchemaChange;
    $Search = [Microsoft.SharePoint.Client.AuditMaskType]::Search;
    $SecurityChange = [Microsoft.SharePoint.Client.AuditMaskType]::SecurityChange;
    $Undelete = [Microsoft.SharePoint.Client.AuditMaskType]::Undelete;
    $Update = [Microsoft.SharePoint.Client.AuditMaskType]::Update;
    $View = [Microsoft.SharePoint.Client.AuditMaskType]::View;
    $Workflow = [Microsoft.SharePoint.Client.AuditMaskType]::Workflow;


$Audit.AuditFlags = $Update, $Undelete, $SecurityChange
$Audit.Update()
$spoSite.AuditLogTrimmingRetention = 90
$spoSite.TrimAuditLog = $true
$Audit.Update()
$Context.ExecuteQuery()

write-host "updated for site:" $object.SiteCollection

Sunday, November 13, 2016

Microsoft Teams— The Chat-based WorkSpace in Office 365

Microsoft Teams

The new chat-based workspace in Office 365. Microsoft Teams is an entirely new experience that brings together people, conversations and content—along with the tools that teams need—so they can easily collaborate to achieve more. It’s naturally integrated with the familiar Office applications and is built from the ground up on the Office 365 global, secure cloud. 


Chat for today’s teams

First and foremost, Microsoft Teams provides a modern conversation experience for today’s teams. Microsoft Teams supports not only persistent but also threaded chats to keep everyone engaged. Team conversations are, by default, visible to the entire team, but there is of course the ability for private discussions. Skype is deeply integrated, so teams can participate in voice and video conferences. And everyone can add personality to their digital workspace with emojis, stickers, GIFs and custom memes to make it their own.


A hub for teamwork

Second, Microsoft Teams brings together the full breadth and depth of Office 365 to provide a true hub for teamwork. Word, Excel, PowerPoint, SharePoint, OneNote, Planner, Power BI and Delve are all built into Microsoft Teams so people have all the information and tools they need at their fingertips. Backed by the Microsoft Graph, intelligent services are surfaced throughout the workspace to help with information relevancy, discovery and sharing. Microsoft Teams is also built on Office 365 Groups—our cross-application membership service that makes it easy for people to move naturally from one collaboration tool to another, preserve their sense of context and share with others.


Customizable for each & every team

Third, since all teams are unique, we’ve invested deeply in ways for people to customize their workspace, with rich extensibility and open APIs available at general availability. For example, Tabs provides quick access to frequently used documents and cloud services. Microsoft Teams also shares the same Connector model as Exchange, providing notifications and updates from third-party services like Twitter or GitHub. Further, we are including full support for the Microsoft Bot Framework to bring intelligent first- and third-party services into your team environment.

Security Teams Trust

Finally, Microsoft Teams provides the advanced security and compliance capabilities that our Office 365 customers expect. Data is encrypted in transit and at rest. Like all our commercial services, we have a transparent operational model with no standing access to customer data. Microsoft Teams will support key compliance standards including EU Model Clauses, ISO 27001, SOC 2, HIPAA and more. And, as customers would expect, Microsoft Teams is served out of our hyper-scale global network of data centers, automatically provisioned within Office 365 and managed centrally, just as any other Office 365 service.


Few points to be noted
  • Microsoft Teams is available to Office 365 commercial customers with one of the following plans: Business Essentials, Business Premium, and Enterprise E1, E3 and E5. Microsoft Teams will also be available to customers who purchased E4 prior to its retirement.
  • To turn on Microsoft Teams, IT admins should go to their Office 365 admin center, click Settings Services & Add InsMicrosoft Teams.
  • Platforms - Microsoft Teams runs on Windows, Mac, Android, iOS and web platforms.

Trainings available from MS. Two different trainings currently available for our IT admins. To view the trainings, visit the Microsoft Virtual Academy website. We have a video on Microsoft Mechanics and more information on the Microsoft Teams Tech Community.


Sunday, November 6, 2016

Save site as template option is not available in SharePoint Online in Office 365

Problem

This issue most frequently occurs because the Community Sites Feature site feature, the SharePoint Server Publishing site feature, or the SharePoint Server Publishing Infrastructure site collection feature is currently enabled or was previously enabled for the affected site. 
SharePoint doesn’t support creating a template from a site where publishing or community features were enabled

More Information
Well, since the Save site as a template option is hidden from the publishing sites settings page we all used the following URL to go there directly:
/_layouts/savetmpl.aspx
Or
/_layouts/15/savetmpl.aspx
Well, that is not going to work anymore in SharePoint online (SPO) if your site is a publishing site or have the publishing features activated.
Resolution

In order to get around this issue you need to update a single property page value in your SPWeb object for the site you are trying to save as a template and you are good to go. The property is called SaveSiteAsTemplateEnabled. We need to set that property to true that’s all

You can use the below sample script for the same in SPO
#Load SharePoint CSOM Assemblies
[System.Reflection.Assembly]::LoadFile("C:\***\Microsoft.SharePoint.Client.dll") | Out-Null
[System.Reflection.Assembly]::LoadFile("C:\***\Microsoft.SharePoint.Client.Runtime.dll") | Out-Null
#Variables for Processing
$SiteUrl = "https://sharepointcollabs.sharepoint.com/sites/pdkmtest"
# Get a reference to the target site
$password = Read-Host -Prompt "Enter password" -AsSecureString
$credentials = New-Object Microsoft.SharePoint.Client.SharePointOnlineCredentials("****@domain.com", $password)
#Set up the context
$Context = New-Object Microsoft.SharePoint.Client.ClientContext($SiteUrl)
$Context.Credentials = $credentials
# Update the property bag value and set it  to the string value “true”
$Context.Web.AllProperties["SaveSiteAsTemplateEnabled"] = "true"
# Commit the property change to server
$Context.Web.Update()
$Context.ExecuteQuery()
Now if you navigate to the Save site as a template page using the URL directly it will show fine and it will allow you to save the site as a template which stores a copy in the Solution gallery of the site collection