Showing posts with label Azure Active Directory B2C. Show all posts

Wednesday, May 17, 2017

Azure Active Directory B2C - Providing sign-up and sign-in to users with Microsoft Accounts

Create a Microsoft account application

To use Microsoft account as an identity provider in Azure Active Directory (Azure AD) B2C, you need to create a Microsoft account application and supply it with the right parameters. You need a Microsoft account to do this. If you don’t have one, you can get it at https://www.live.com/.
  1. Go to the Microsoft Application Registration Portal and sign in with your Microsoft account credentials.
  2. Click Add an app.
  3. Provide a Name for your application and click Create .
  4. Copy the value of Application Id. You will need it to configure Microsoft account as an identity provider in your tenant.
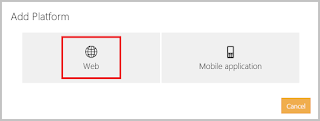
  5. Click on Add platform and choose Web.

  6. Enter https://login.microsoftonline.com/te/{tenant}/oauth2/authresp in the Redirect URIs field. Replace {tenant} with your tenant's name (for example, contosob2c.onmicrosoft.com).
  7. Click on Generate New Password under the Application Secrets section. Copy the new password displayed on screen. You will need it to configure Microsoft account as an identity provider in your tenant. This password is an important security credential.

  8. Check the box that says Live SDK support under the Advanced Options section. Click Save.

Configure Microsoft Account as an identity provider (IDP) in your tenant

  1. Follow these steps to navigate to the B2C features blade on the Azure portal.
  2. On the B2C features blade, click Identity providers.
  3. Click +Add at the top of the blade.
  4. Provide a friendly Name for the identity provider configuration. For example, enter "MSA".
  5. Click Identity provider type, select Microsoft account, and click OK.
  6. Click Set up this identity provider and enter the Application Id and password of the Microsoft account application that you created earlier.
  7. Click OK and then click Create to save your Microsoft account configuration.

Azure Active Directory B2C- Register your application

If you have the B2C features blade pinned to your Startboard, you will see the blade as soon as you sign in to the Azure portal as the Global Administrator of the B2C tenant.
You can also access the blade by clicking More services and then searching Azure AD B2C in the left navigation pane on the Azure portal.

Register a web application

  1. On the B2C features blade on the Azure portal, click Applications.
  2. Click +Add at the top of the blade.
  3. Enter a Name for the application that will describe your application to consumers. For example, you could enter "Jo B2C App".
  4. Toggle the Include web app / web API switch to Yes. The Reply URLs are endpoints where Azure AD B2C will return any tokens that your application requests. For example, enter https://localhost:38143/.
  5. Click Create to register your application.
  6. Click the application that you just created and copy down the globally unique Application Client ID that you'll use later in your code.
  7. If your web application will also be calling a web API secured by Azure AD B2C, you'll want to create an Application Secret by going to the Keys blade and clicking the Generate Key button.

Register a web api

  1. On the B2C features blade on the Azure portal, click Applications.
  2. Click +Add at the top of the blade.
  3. Enter a Name for the application that will describe your application to consumers. For example, you could enter "Jo B2C api".
  4. Toggle the Include web app / web API switch to Yes. The Reply URLs are endpoints where Azure AD B2C will return any tokens that your application requests. For example, enter https://localhost:38143/.
  5. Enter an App ID URI. This is the identifier used for your web API. For example, enter 'notes'. It will generate the full identifier URI underneath.
  6. Click Create to register your application.
  7. Click the application that you just created and copy down the globally unique Application Client ID that you'll use later in your code.
  8. Click on Published scopes. This is where you define the permissions (scopes) that can be granted to other applications.
  9. Add more scopes as necessary. By default, the "user_impersonation" scope will be defined. This gives other applications the ability to access this api on behalf of the signed-in user. This can be removed if you wish.
  10. Click Save.

Register a mobile/native application

  1. On the B2C features blade on the Azure portal, click Applications.
  2. Click +Add at the top of the blade.
  3. Enter a Name for the application that will describe your application to consumers. For example, you could enter "Jo B2C App".
  4. Toggle the Include native client switch to Yes.
  5. Enter a Redirect URI with a custom scheme. For example, com.onmicrosoft.jollsam.appname://redirect/path. 
  6. Click Save to register your application.
  7. Click the application that you just created and copy down the globally unique Application Client ID that you'll use later in your code.
  8. If your native application will also be calling a web API secured by Azure AD B2C, you'll want to create an Application Secret by going to the Keys blade and clicking the Generate Key button.

Choosing a redirect URI

There are two important considerations when choosing a redirect URI for mobile/native applications:
  • Unique: The scheme of the redirect URI should be unique for every application. In our example (com.onmicrosoft.jollsam.appname://redirect/path), we use com.onmicrosoft.jollsam.appname as the scheme. We recommend following this pattern. If two applications share the same scheme, the user will see a "choose app" dialog. If the user makes an incorrect choice, the login will fail.
  • Complete: Redirect URI must have a scheme and a path. The path must contain at least one forward slash after the domain (for example, //jollsam/ will work and //jollsam will fail).

Build a Quick Start Application

Now that you have an application registered with Azure AD B2C, you can complete one of our quick-start tutorials to get up and running