Summary: Use the Azure Access Control Service to authenticate your SharePoint Server 2013 users with Azure Active Directory.
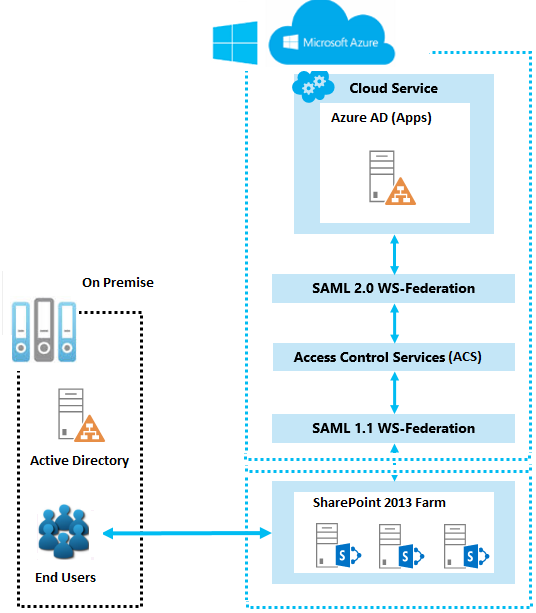
This article explains how you can use the Azure Access Control Service to authenticate your SharePoint 2013 users with Azure AD, instead of your on-premises Active Directory. In this configuration, Azure AD becomes a trusted identity provider for SharePoint 2013. This configuration adds a user authentication method that is separate from Active Directory authentication used by the SharePoint 2013 installation itself. For more information on WS Federation, see Understanding WS-Federation.
The below diagram shows how authentication works for SharePoint 2013 users in this configuration.
Configuration Overview
- Create a new Azure AD tenant and namespace.
- Add a WS-Federation identity provider.
- Add SharePoint as a relying party application.
- Create a rule group for claims-based authentication.
- Configure the X.509 certificate.
- Create a claim mapping.
- Configure SharePoint for the new identity provider.
- Set the permissions.
- Verify the new provider.
Create ACS and Azure AD App
Use the following steps to create a new Azure AD tenant and an associated namespace. In this example, we use the namespace "specmazureadservice"- In the Azure Management Portal, click Active Directory.
- Click Access Control Namespaces, and create a new namespace.
- Click Manage on the bottom bar. This should open this location, https://specmazureadservice.accesscontrol.windows.net/v2/mgmt/web.
- Go to Azure AD and create new App. In my case the app name is 'AZ AD Tenant APP'.
- Put the Sign-on Url same as ACS url "https://specmazureadservice.accesscontrol.windows.net/"
- App ID can be any unique url. I have used the same ACS url.
- For Reply URL, use the same ACS url "https://specmazureadservice.accesscontrol.windows.net/"
- Save the App.
- click on the "View Endpoints" at bottom and copy "Federation Metadata Document" url.
Add a WS-Federation identity provider to the namespace
Use the following steps to add a new WS-Federation identity provider to the "specmazureadservice" namespace.
- From the Azure management portal, go to Active Directory > Access Control Namespaces, select the ACS created and then click Manage.
- From the Azure Access Control portal, click Identity Providers > Add, as illustrated in the following figure

- Click WS-Federation identity provider, as illustrated in the following figure, and then click Next

Fill out the display name and logon link text, and then click Save. For the WS-Federation metadata URL, put the url copied from AD App Federation Metadata document. eg. https://login.microsoftonline.com/e0b26355-1889-40d8-8ef1-e559616defth/federationmetadata/2007-06/federationmetadata.xml. The following picture illustrates the setting.
Add SharePoint as a relying party application
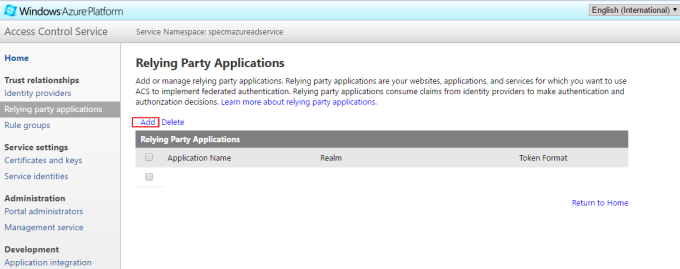
- From the Azure Access Control portal, click Relying party applications, and then click Add, as illustrated in the following picture
- Provide the display name eg "ECM Azure AD Rely".
- provide Realm , eg - "urn:sharepoint:spapps-stg".
- provide Return url as your sharepoint web application url "/_trust" , eg- "http://sharepoint.com/_trust".
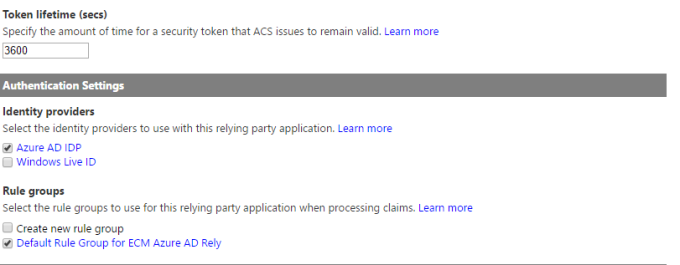
Select SAML 1.1 as the token format url. Select IDP and click save. Below picture gives an overview of how it looks like.
Create a rule group for claims-based authentication
- In the left pane, click Rule groups, and then click Add.
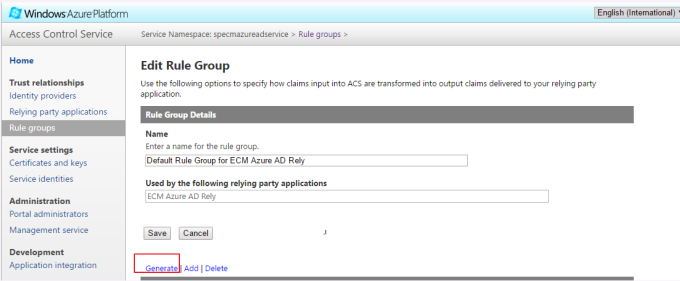
- Type a name for the rule group, click Save, and then click Generate. For the purposes of this article, we are using Default Rule Group for. ECM Azure AD Rely, as illustrated in the below picture.
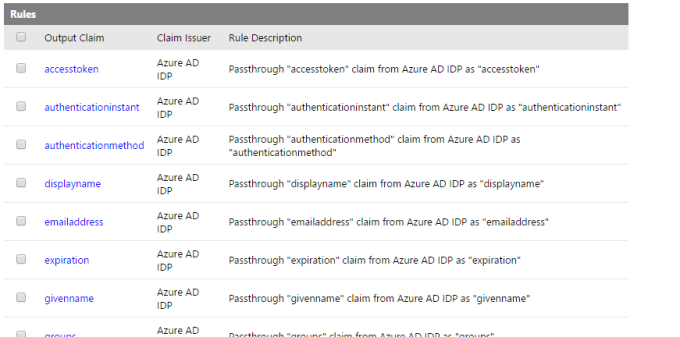
Click the rule group that you want to change, and then click the claim rule that you want to change. For the purposes of this article, we add a claim rule to the group to pass name as upn, as illustrated by the below picture.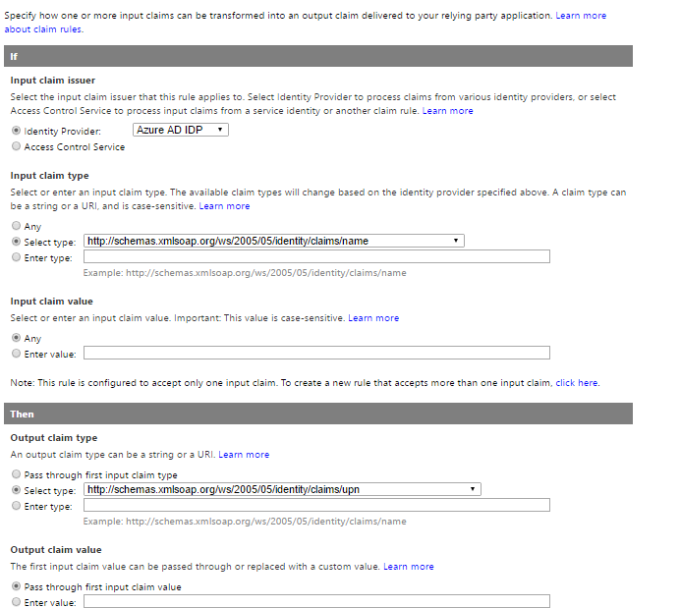
Configure the X.509 certificate
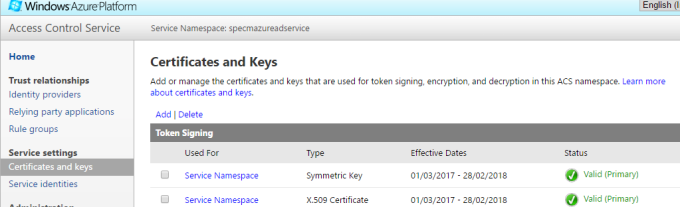
- In the Access Control Service pane, Click on Certificates and Keys as given in below pciture
- Click on Add and copy the makecert command as highlighted in below picture.
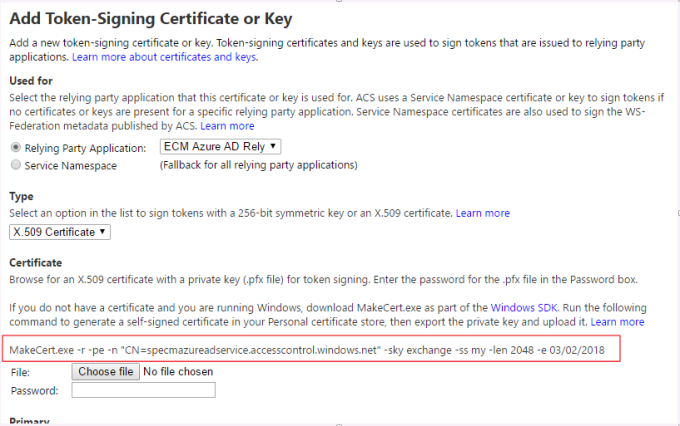
- Create a new certificate with the command in local machine and export it as .pfx (with password) and .cer .
- Upload the TokenSigning certificate in the choose file and provide the same password.
- Make it primary and click save.
Create a claim mapping by using SharePoint Management Shell
Below is the script I used to configure the claim mapping and New Trusted Identity provider for Azure AD Connect.
$realm = "urn:sharepoint:spapps-stg"
$cert = New-Object System.Security.Cryptography.X509Certificates.X509Certificate2("F:\Jollgin\certs\ACSTokenSigning.cer")
New-SPTrustedRootAuthority -Name "ACS EK Token Signing" -Certificate $cert
$map = New-SPClaimTypeMapping -IncomingClaimType "http://schemas.xmlsoap.org/ws/2005/05/identity/claims/upn" -IncomingClaimTypeDisplayName "UPN" -SameAsIncoming
$map2 = New-SPClaimTypeMapping -IncomingClaimType "http://schemas.xmlsoap.org/ws/2005/05/identity/claims/givenname" -IncomingClaimTypeDisplayName "GivenName" -SameAsIncoming
$map3 = New-SPClaimTypeMapping -IncomingClaimType "http://schemas.xmlsoap.org/ws/2005/05/identity/claims/surname" -IncomingClaimTypeDisplayName "SurName" -SameAsIncoming
New-SPTrustedIdentityTokenIssuer -Name "ACS Provider" -Description "SharePoint secured by SAML in ACS" -realm $realm -ImportTrustCertificate $cert -ClaimsMappings $map,$map2,$map3 -SignInUrl "https://specmazureadservice.accesscontrol.windows.net/v2/wsfederation" -IdentifierClaim "http://schemas.xmlsoap.org/ws/2005/05/identity/claims/upn"
Configure SharePoint for the new identity provider
- Verify that the user account that is performing this procedure is a member of the Farm Administrators SharePoint group.
- In Central Administration, on the home page, click Application Management.
- On the Application Management page, in the Web Applications section, click Manage web applications.
- Click the appropriate web application.
- From the ribbon, click Authentication Providers.
- Under Zone, click the name of the zone. For example, Im using Custom as my web application is an extended one.
- On the Edit Authentication page, in the Claims Authentication Types section, select Trusted Identity provider, and then click the name of your provider, which for purposes of this article is ACS Provider. Click OK.
The below picture illustrates the Trusted Provider setting
Set the permissions
For testing purpose, Go to user policy in web application and provide everyone read access to the web application and later on remove and give individual permissions in site level.
Verify the new provider
- Enter the web application url in browser.
- I had my custom login page and it looks like below

- Click on Azure AD Connect and you will be redirected to login.microsoftonline.com. Provide you organization account or onmicrosoft account and once authenticated with Azure AD, you will be back to the SharePoint onpremise application.
With this you have acheived the WS Federation login for your on premise sharepoint application, you can have onmicrosoft account which is not in you AD and login to on premise sharepoint application.


